Gianduja
I don’t know about your guys, but I am an absolute chocolate maniac. So big it should be totally illegal. So, when I saw a piece of this on Mila’s blog, that was it. My eyes went red, my heart bumped like crazy, I started drooling… Quite disgusting, I know. Anyway, If I had to chose the last mouthful I’d want to have before I die, it would be a spoon of Nutella with a whole hazelnut. Yeah… Alright, alright!
So, I figure- how come that it never occurred to me to make chocolate cake in my cooking classes at Niki’s?
As Italian literature graduate I cannot hide my propensity to anything Italian. And my curiosity when it comes to the origin of words. Gianduja is originally a name of a character deriving from Italian Commedia dell’arte (oh, university days!) and he was a mascot of Torino and Piemonte in general. A very charmy fellow. The narrative says he had a jealous girlfriend, Giacometta. Now, Piemonte is famous for its hazelnut confectionery. Way back during the Napolean regency in Piemonte appears a chocolate with 30% of hazelnut paste. A very smart entrepreneur at the time Pierre Paul Caffarel comes to the idea to turn a ex-tannery into a chocolate factory (God bless him!) and comes up with the revolutionary product called Gianduiotto, a small chocolate in 1852, and then Gianduja chocolate, a soft, mouth watering hazelnut chocolate that became his second big success. Almost a century later Pietro Ferrero, a small baker from Alba, right after the Second Word War, makes a cream called “Pasta gianduja” and manages to sell in a first batch 300kg of cream from his small family owned bakery in Alba- which is guess where-in Piemonte! Some 20 years later his son ambitiously wanted to market the product across the Europe and had it renamed to- Nutella 🙂 And so there is the story for all Nutella lovers.
So, ladies and gents, here it is- The Chocolate Cake called Gianduia!
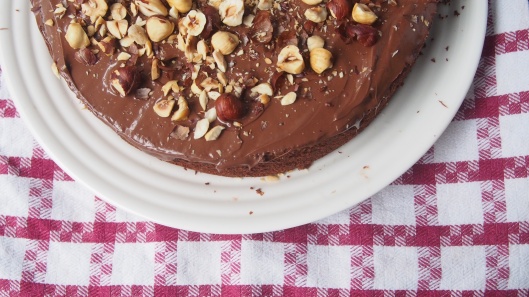
• 250g whole blanched hazelnuts
• 200g butter, cubed, plus extra for greasing
• 200g dark chocolate, broken into squares
• 6 medium eggs, separated
• 200g/7oz caster sugar, preferably golden
• 3 tbsp hazelnut liqueur or amaretto (or fresh orange juice)
• 150g/5½oz chocolate and hazelnut spread
Method
1. Preheat the oven to 200C.
2. Put the hazelnuts on a baking tray and roast them for 10 minutes, giving the pan a shake halfway through, until they are golden brown. Remove and leave them to cool for a few minutes.
3. Reduce the oven temperature to 180C. Butter a 23cm springform cake tin and line the base with baking paper.
4. Place 200g of the hazelnuts in a food processor and blend them until they are fairly finely ground, but leave a few coarser pieces to add texture. Set the remaining 50g hazelnuts aside.
5. Put the butter and chocolate in a heatproof bowl and set it above a pan of gently simmering water. Stir occasionally and as soon as nearly all the chocolate has melted, remove the bowl from the pan and continue to let the chocolate melt in the residual heat.
6. Stir in the ground hazelnuts and leave the mixture to cool for 5 minutes.
7. Beat the egg yolks and sugar together with an electric hand-whisk for at least 5 minutes until pale and creamy, then stir into the chocolate mixture until thoroughly combined.
8. In a clean bowl, whisk the egg whites until stiff peaks form.
9. Working quickly, stir the hazelnut liqueur, amaretto or orange juice, into the chocolate mixture to soften. Add a couple of tablespoonfuls of the whisked egg whites and stir until thoroughly combined, then gently fold in the remaining egg whites.
10. Spoon the mixture into the prepared tin and bake in the centre of the oven for 35–40 minutes or until the cake is well risen and firm.
11. Remove the cake from the oven and leave it to cool in the tin for 30 minutes. Invert the cake on to a serving plate, then peel off the lining paper and leave it to cool completely.
12. When the cake is cold, spread it with the chocolate and hazelnut spread and sprinkle with the hazelnuts that you set aside – these can be whole or chopped, whatever you prefer.
BUON APPETITO!
(Recipe taken from BBC)
